ToneBase is a web-based information system designed to facilitate online music instruction through the posting, curation, and viewing of online videos.
The ToneBase Team comprised student fellows from the Yale Entrepreneurial Institute (YEI). They commissioned Data Creative to build the ToneBase API 1.0, a RESTful back-end web service to power the front-end client application they built themselves.

Throughout the entirety of the project engagement, I was inspired by the passion, vision, and development capabilities of the ToneBase team. Their collaboration led to a successful project which met requirements and was delivered on-time.
I planned, designed, and developed this project from conception to final delivery in less than 45 days using a traditional (“waterfall”) systems development methodology, infused with some “agile” techniques.
There’s a lot of waterfall-bashing going around these days, but I find its the most efficient methodology, especially for client engagements, and especially if you are experienced and capable, and have developed similar systems in the past. Waterfall forces you to have a plan, and a good plan allows you to push back effectively against scope creep. For a straightforward REST API based on clear requirements, I stand by the waterfall method. It doesn’t mean you have to abandon agile practices like version control, collaborative issue-tracking, and iterative releases.
The project consisted of an initial “Discovery Phase”, followed by a ten day “Planning Phase”, followed by three week-long “Development Sprints”, followed by a final week-long “Maintenance and Integration Phase”.
The clients posted the job to a local New Haven technology meetup group email list. I responded to the request via email and met with the clients in-person twice to further discuss overall product vision and scope. As a result, I prepared and delivered a “Scope of Services” document which would outline the terms of the engagement.
The Scope of Services document was an essential part of the success of this project. It established mutual expectations and a shared understanding between developers and clients. It specifically defined the system scope and goals, but did not assume to predefine any specific technical requirements.
The document included the following sections:
I was thankful the Terms of Participation allowed me to develop the API using open source technologies like PostgreSQL and Ruby on Rails, and release the software according to an open source license.
It took around ten days of intermittent client meetings and whiteboard sessions to translate conceptual ideas and user stories into a tangible system design.
It can be tempting to leave some planning efforts for future determination, but I advise you invest time up-front to establish a solid plan. It makes the development process so much easier. Even if the planning phase takes a few more days, this will likely lead to development phase efficiencies which by far outweigh the initial time investment. Comprehensive planning efforts also preserve the relationship between clients and developers by preventing conflicts over differences of expectations caused by plan ambiguity. I advise you don’t move into the development phase without first establishing and agreeing upon a solid, comprehensive plan.
As a result of this planning effort, I produced a “Technical Requirements” document, which narrowly and specifically defined system scope and requirements.
Like the Scope of Services document, the Technical Requirements document was also an essential part of the success of this project. And it also served to establish mutual expectations and a shared understanding between developers and clients.
Crafting a quality requirements document is essential to minimizing ambiguity and maximizing productivity during the development phase. Especially because thoughtful technical requirements lend themselves to be directly translated into subcomponent developer tasks, and allow the developer to focus on implementing instead of asking questions and waiting for further refinement of requirements. Even if you are using an agile approach, I would recommend you define requirements up-front in as comprehensive a manner as possible.
The Technical Requirements document included the following sections:
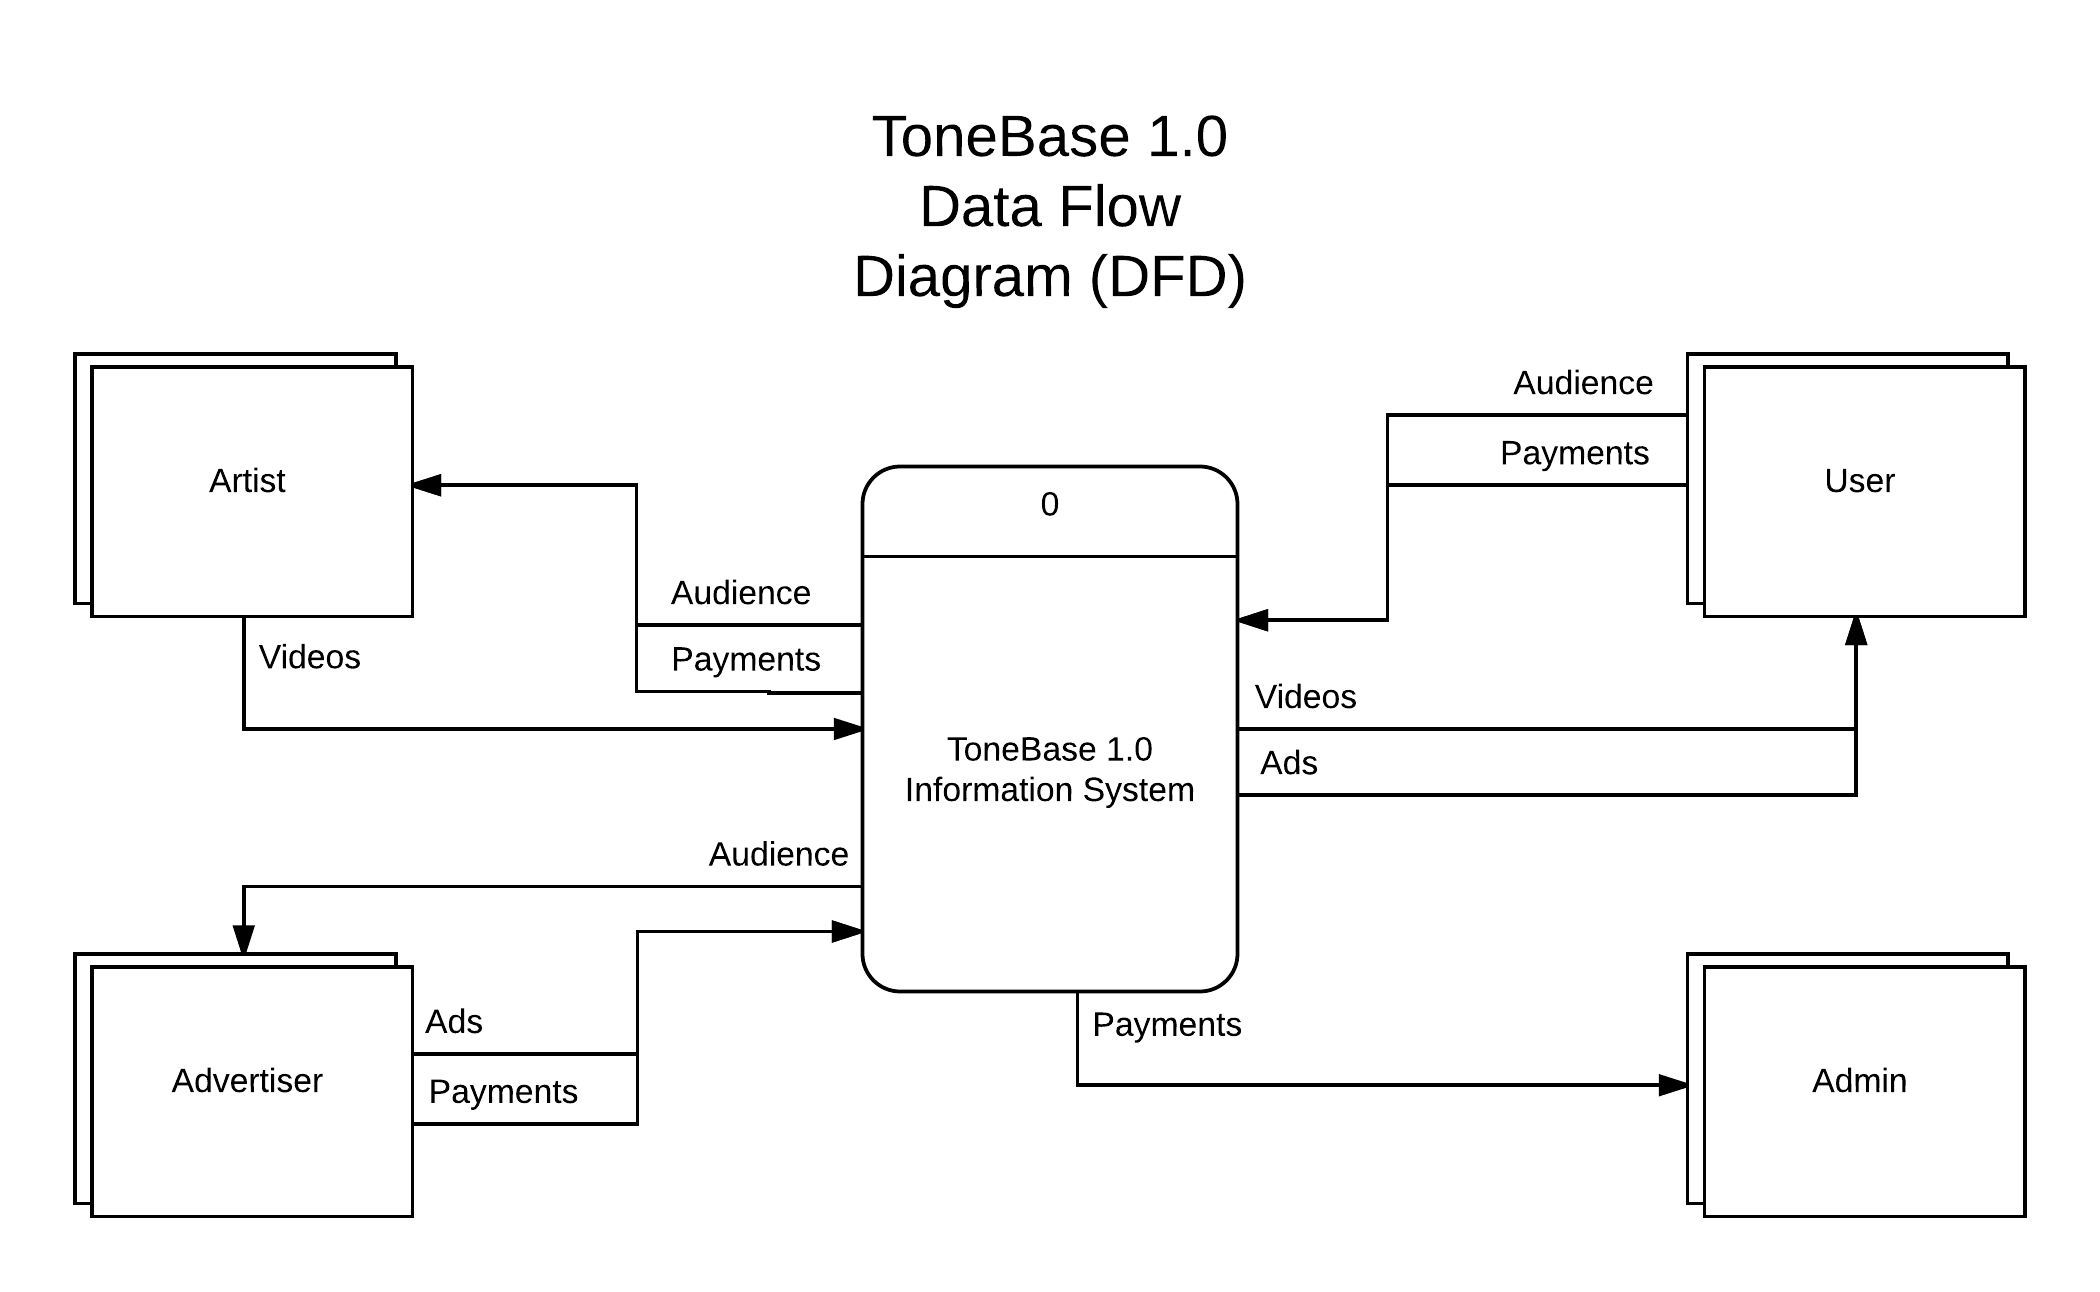
The Information Requirements section included a Data Flow Diagram, accompanied by a written explanation.
The System Architecture section included a Database Architecture Diagram and a Network Architecture Diagram, accompanied by written explanations of each.

The final database architecture would end up slightly differing from the draft design, but the draft was instrumental in its ability to guide development efforts. When planning a system design, don’t be afraid to give it your best attempt and leave room for future changes, as long as they are principled and justified.
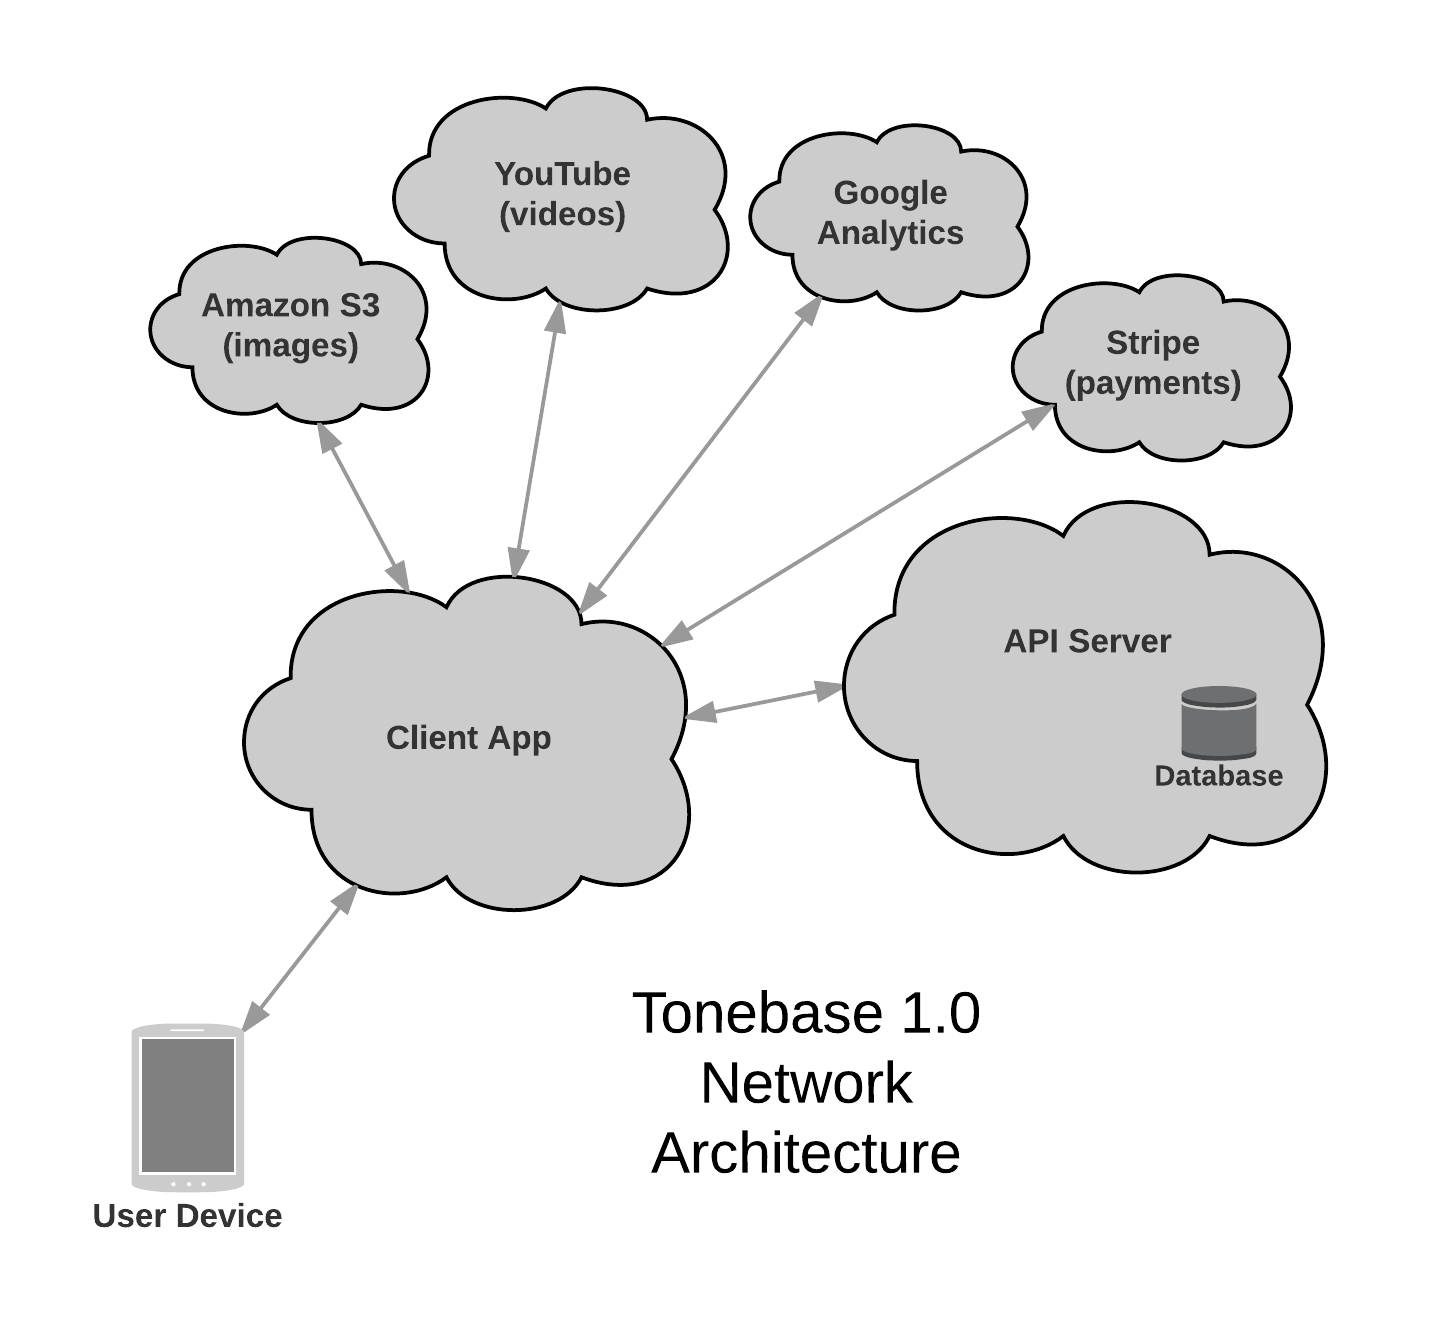
Not all parts of the system architecture were deemed in-scope for this project’s development efforts, but it was still good to outline the entire system this way. Diagrams like this help clients understand how the system will work, and what the relationship is between various system components.
The User Roles and Permissions section defined the following roles:
It also defined a set of permissions for each user role. These permissions specified which actions could be performed by each role, and directly mapped user capabilities with specific database resources and CRUD operations (e.g. “List”, “Show”, “Create”, “Update”, and “Destroy”).
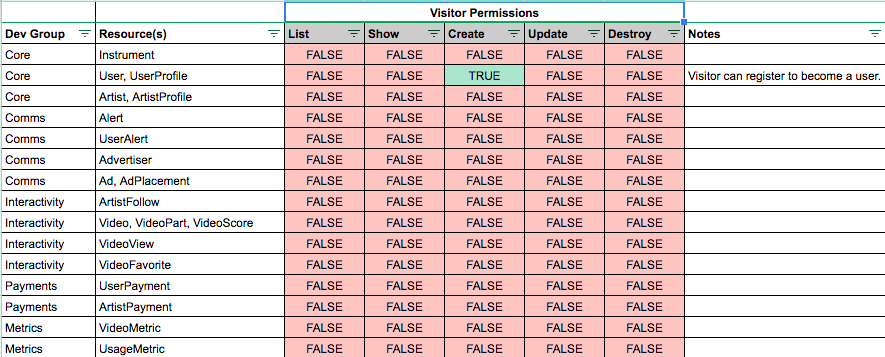
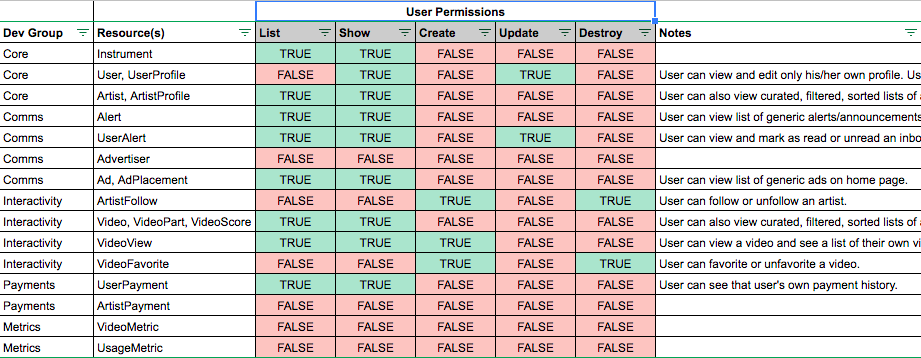
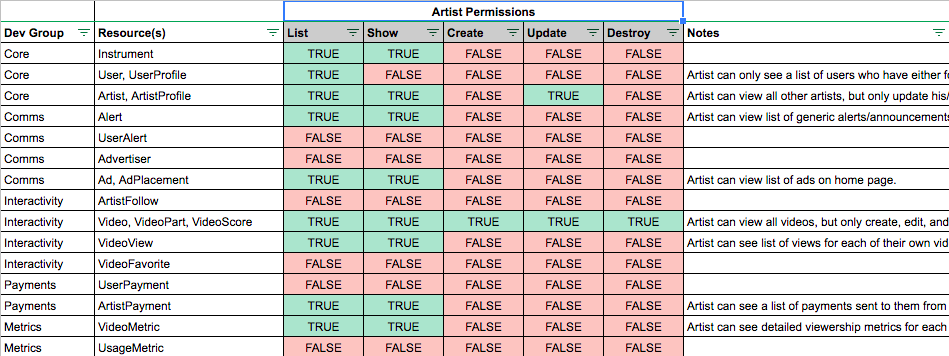

These CRUD operation mappings provided clear requirements which would directly translate into developer efforts and aid development efficiency. Also, the “Notes” column formed the basis of test scenarios and use cases which enabled a test-driven development approach.
The System Functionality section further elaborated on the set of in-scope features for each role. These feature descriptions included user experience narratives, client application responsibilities (including example requests), and API server responsibilities (including example responses).
After compiling an inventory of feature requirements, I used a simple spreadsheet to track development priorities and share progress with my clients.
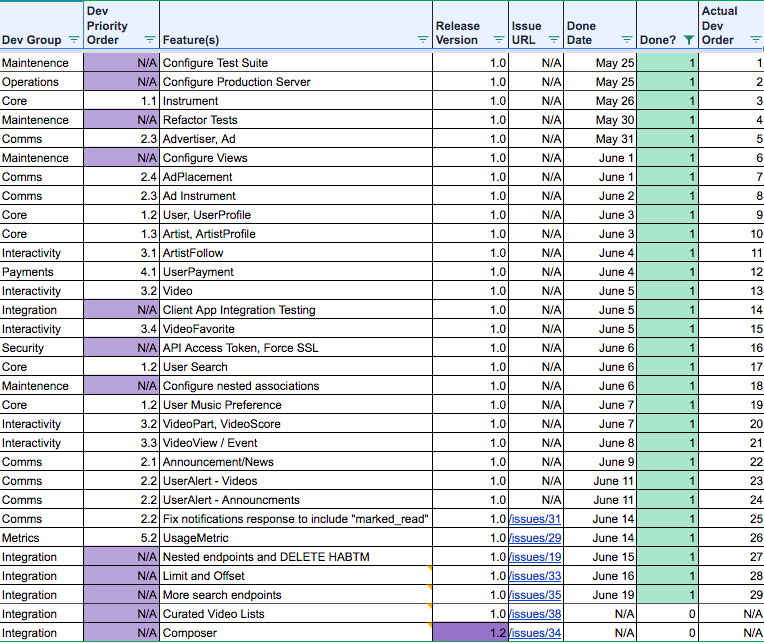
The purple highlighted items were not originally included in project planning, but arose out of necessity during the development process. In any project, its important to leave a buffer for unplanned efforts, especially things you “know you don’t know”. Also, you’ll notice the features did not always get implemented in their planned priority order. As a developer in-tune with your own creative instincts, its important to be somewhat flexible and follow your gut feeling about when the time is right to develop any given feature.
I started with a document-driven development approach whereby I populated a list of API endpoints which had been defined as part of the technical requirements document. Over time, I would iteratively update the API documentation as I implemented each one.
After generating a new Rails app, I configured the RSpec test suite and deployed to a Heroku-hosted production server as soon as possible. This enabled me to practice test-driven development and iterative deployment throughout the entire development process.
After prepping the application for development of business logic, I started by implementing tests and functionality for the Instrument resource. This resource was my top priority because the database architecture diagram showed it didn’t depend on any other resources but many others either directly or indirectly depended on it. I figured it would be more efficient to start with an up-stream resource than to start with a down-stream resource which would need to be revised later after the implementation of the up-stream resource.
I then implemented tests and functionality for advertisement-related resources because they depended on the Instrument resource but had no other dependencies. I saw this group of related resources as comprising one of the application’s stand-alone modules that included its own set of logic. I wanted to be able to complete this straightforward and somewhat isolated part of the system’s domain and move on. After implementing these resources, I noticed commonalities among the application’s controllers and refactored them into a generic ApiController from which the resource-specific controllers could inherit. The most important decision I made at this time was to also refactor shared test code into RSpec “shared examples”. This decision would drastically increase the pace and ease of future development, as it allowed me to write tests like it_behaves_like "an index endpoint" instead of writing a large file full of somewhat duplicative test code. Investing time early on to refactor tests was one of the best and most productive decisions I made during the development process, even though it initially set me back a day or two.
At this point, I was ready to turn my focus to the application’s views. I wrote view tests and configured JBuilder to render the views. I had not previously been very familiar with JBuilder, so I deliberately waited until I had some preliminary API responses working before I incorporated it into the project. It ended up being very helpful and efficient in its own right, and another great decision. I would highly recommend JBuilder for future projects, and have since incorporated it into my standard Rails configuration.
By this time, I had also configured the application for continuous integration using the Travis platform.
My initial investments in application setup and refactoring started to pay off, allowing me to implement tests and functionality for a number of additional resources in quick succession.
I eventually implemented tests and functionality for the User resource. Initially, I thought I might need to configure Devise to handle user authentication, but since the client application would be handling user authentication, I was able to implement this resource like any other normal resource. I used a :role attribute in conjunction with an :access_level attribute to distinguish between the various user roles and permissions.
Then I implemented various resources which depended on the User resource but no other resources. This included a mechanism to allow certain users to “follow” others. I knew this would involve a bi-directional self-referential relationship between users, and wasn’t sure where to begin. So I started by creating a resource called UserFollow to see how it would work. But I quickly learned my choice of name was producing undesired, counter-intuitive relationship names and as a result changed the name to UserFollowship.
The two resources at the heart of this domain model were User and Video, the latter depending on the former. So after feeling comfortable with my implementation of user-related resources I implemented tests and functionality which would allow them to upload associated videos. I knew there would be additional video-related associations (e.g. VideoPart and VideoScore), but I wasn’t sure how to implement these nested associations, so I skipped them and resolved to return to them later.
As I mentioned, there was a time I thought I might be using Devise for user authentication, so I had put off incorporating an authentication mechanism until after implementing user-related resources. We knew the client application would be making requests which needed to pass an API key. I had previously built read-only APIs which passed API keys as part of the request’s URL parameters, but the solution for this API needed to be more secure, so we decided to pass API keys via request headers. I had never done this before, so it took some research and integration testing using an example Node.js client application to figure out how to do it successfully. When integration testing, I ended up needing to modify the APIController to skip_before_action :verify_authenticity_token, and configure Rack::Cors to enable cross-origin requests. And after successfully demonstrating the client application’s ability to issue GET requests, I finally configured the API to force SSL and enforce API Key authentication.
At this time I decided to turn back to the challenge of creating nested associations via a single client request (i.e. the nested video-related associations I had been putting off). I started with nested user-related associations (e.g. UserProfile and UserMusicProfile), before turning to the video-related associations. My implementation required me to revise some of my RSpec shared examples, and to add some workaround methods to the User and Video models which would only be used for the purpose of enabling these shared examples. It wasn’t the prettiest solution, but it worked and allowed me to keep leveraging my shared examples, so I was happy to move on.
Then came a final flurry of resource implementations to complete the domain model. Afterwards, I implemented some final touches, undertaking efforts to paginate responses and improve the mechanism by which the client application could search for specific records.
By this time, I had been sprinting for a few weeks around the clock without much rest, so I was happy to finish development and deliver the software!
Delivering the system’s final source code was easy because I had been using version control from the beginning, pushing commits to a remote GitHub repository multiple times per day. The GitHub interface allowed my clients to easily copy, download, investigate, and deploy the application’s source code. Version control also facilitated a transparent development process, enabling my clients to see development progress unfold in real-time.
The final documentation deliverable included instructions on how to authenticate to the API, listed all database resources and corresponding API endpoints, and provided example requests and responses for each endpoint. It also included a final depiction of the API’s domain model (below), and the aforementioned example client application to show my clients how to integrate with the API using their desired technologies (in this case, a Node.js application using the Express framework).
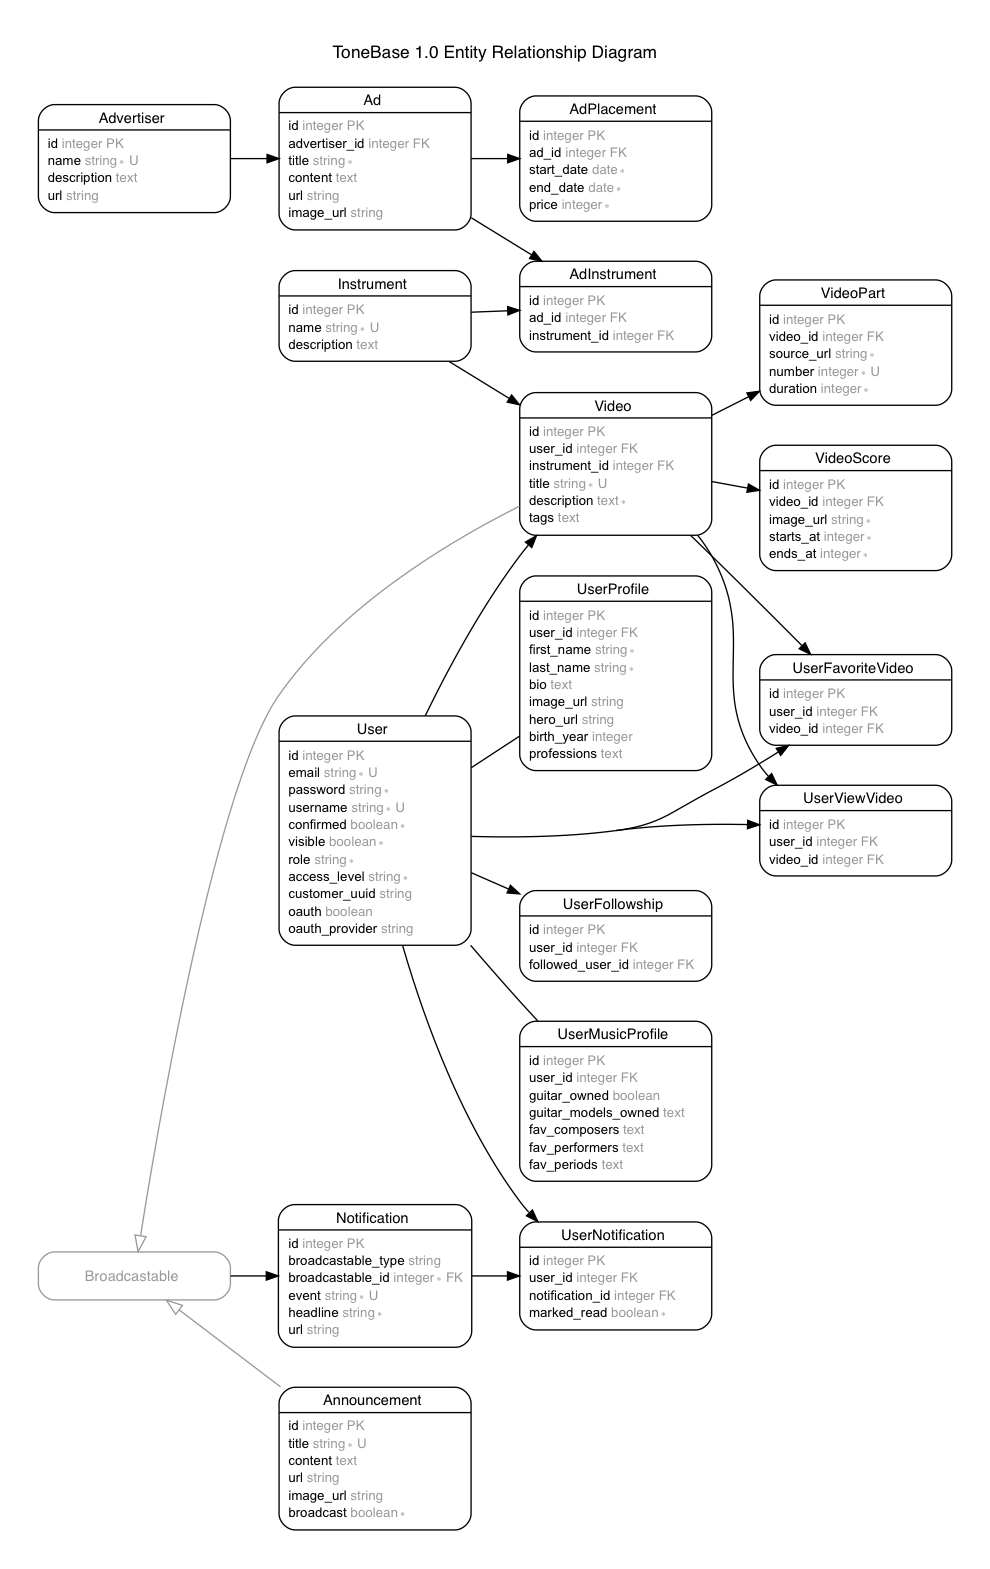
The “Rails ERD” gem auto-generated this diagram based on actual properties and architecture of the final database. So easy!